Posted by: freelancer2011 | May 24, 2013

Calais to Reims, France

First time riding a motorcycle abroad!! 🙂
Had a brief spell of mental block and forgot if it’s km/hr or mph but figured it out reasonably quickly enough 😉

Only a measly 176 miles done in wet, treacherous and windy conditions.

Staying overnight in Reims…

20130524-210549.jpg

Posted by: freelancer2011 | May 24, 2013

The Finished Conversion!

The competed bike just before boarding onto the ferry for her first trip abroad! 😀 Will hopefully be able to take her to Croatia and back! 🙂

20130524-204257.jpg

Posted by: freelancer2011 | May 16, 2013

Bike Prep: Barkbusters VPS Lever Protectors / Handguards

To protect my levers, I went with Barkbusters. £85 for the core product, £25 for the plastic guards themselves. Both sourced from MetalMule.com. Made in Australia, these are some great lever protectors.

IMG_0336

I went with Barkbusters in the end as I figured out if I drop the bike and the plastic should break, I can easily get relatively cheap replacements. Whereas, for example, if I went with Touratech or any other manufacturers that seem to rely on just plastic with no metal bracing backbone, I wasn’t sure if they’d be able to withstand a handful of drops. In that case, I reckon I would have to buy another set. I got mind block and completely forgot about Acerbis’ offering. -Probably getting the 2 brands confused. Gutted!

Pros: Already paid for itself with about 2-3 stationary drops. Plastic takes drops well with metal bar showing no signs of being bent out of shape. Adjustable wind shields (2 stop positions)! 😀

Cons: Be careful when installing it. The supporting brace that connects to the handlebar is not angled/as forgiving as say BMW’s own (or that of other manufacturer’s) lever protectors. If inadvertently trialling and erroring like me, you may end up denting the ‘faux’ tank fairing when swinging the handlebars, afterwards. Ouch 😦

Posted by: freelancer2011 | May 13, 2013

Bike Prep: SW Motech Engine ‘Sump’ Guard

One of the most critical upgrades to give my baby! 😀 To help stop stones and chippings from damaging the underbelly of the engine. I went with the SW Motech one from MotorbikesAndParts.co.uk for £140.60.

IMG_0337

Chose this model because:

*Compatibility with the engine bars (same manufacturer);
*Competitively priced vs. OEM;
*Extended, higher coverage of the oil filter, oil cooler, manifolds at front and rear;

It looks better installed than when off 🙂 I think it’s beautifully designed and great coverage of vulnerable parts.

Cons: It will have to be removed for oil filter changes at 6k mile/12 month service intervals (time, cost, etc).

Posted by: freelancer2011 | May 1, 2013

Bike Prep: Headlight Lens Guard

22nd September 2012 – £64.80/$130 (BMW OEM).

According to microfiches openly available online, the lens itself just costs about ~£16/$36 and the headlight unit sells for ~£220/$441.36. According to the dealer I was talking to, in the event of a cracked lens, they can only sell the whole headlight unit (incl. lens) as one complete unit only. IF this argument is true, that would be extremely pricey.

Rather than take chances, I decided to protect just the lens as I can imagine a loose chipping from a vehicle in front on poorly paved roads in the UK or abroad would probably be a high likelikhood.

Reasons:
*Chose polycarbonate coverings over the ‘metal grid’-only ones so that even the smallest of stones would have a lesser chance of hitting the headlight lens;

IMG_0071

I either missed, or out of convenience, just went with BMW. When, in retrospect, I should have gone for the great, money-saving combo of the aptly-named ‘Headlight Guard Combo’ from Rugged Roads at just £65/$130 for both!

I think this would work better. As perhaps, in a simple guy’s mind (i.e. mine), if a LARGER stone/chipping were to hit the metal grid layer should absorb and deflect first rather than hit the polycarbonate layer first. -In the hope that the polycarbonate layer would remain uncracked (whereas with mine would be damaged straightaway).

Posted by: freelancer2011 | April 30, 2013

Bike Prep: SW Motech Engine Crash Bars

27th October 2012 – Had to do some homework and checkout some forum threads for this. E.g. UKGSER.com for BMW owners. It cost £165.17 from BykeBitz.co.uk. SW Motech appear to be a German company and these bars were made in the Czech Republic (from label).

In the end, I went with SW Motech as they were competitively priced versus OEM (and so was SW Motech’s Engine Sump Guard/Bash Plate which I would save-up for and later get in time). To me, they also offer higher protection of the side fairing panels. I noticed from reading the forums a lot of people were asking about compatibility between crash bars and sump guards. So, in order to remove any doubt, I knew I had to choose a combo that was stated to have worked together and where both seemed to have offered good protection (and within my budget). So, I decided to go with SW Motech for both of these protective pieces of kit.

IMG_0023 SW Motech Crash Bars for F650 GS Twin IMG_0024

With not all bolts, nuts and washers being symmetrical to the motorbike (and it being cold and wet outside at the time), I decided to look at the overall installation process, layout all the pieces (below) and broke it down into 3 manageable parts. Thereby, when outside it would just take a matter of minutes to install.

IMG_0026

with the above, I bagged the 3 separate sections (left-hand side’s, right-hand side’s and the central part) into 3 bags. Install must have taken about 45 minutes in the end.

Review: Very pleased with these bars. Very strong and sturdy. The design seems to blend-in perfectly with the BMW F650GS. They’ve already paid for themselves with 2 drops, recently. There’s barely any noticeable scratches and in the future at some point, I’m looking forward to smoothing them out (maybe with a bit of grit-wet paper) and re-spraying them. 🙂

IMG_0033 IMG_0035 IMG_0036
IMG_0034 IMG_0032
Posted by: freelancer2011 | April 29, 2013

Bike Prep: Touratech 38L Top Box

21st July 2012 – I had a need develop to have a top box for commuting, grocery shopping & to lock my helmet in the box when roaming around town.

In the end, I decided to choose the Touratech 38L model in anodised finish with ‘Rapid Trap’ mounting system. Reasons I went for this make and setup over the competitors were:-

*Mounting rack compatibility with the Touratech panniers that I would get later down the line;
*Locks and keys can be matched with panniers’ own in the future (meaning fewer keys);
*Ability to remove the box when arriving home or on the road at an instance (not covered under insurance if stolen);
*Can lock my helmet in there (so can go out and about town ‘hands-free’);
*Nice, gorgeous curves and finish! 😀

IMG_0928 IMG_0933

Assembling the locks myself to the ‘Rapid Trap’ lock and aligning the metal wiring to the way it was setup can be a bit fiddly and the best tool I used were a pair of precision tweezers from a hobby/craft shop.

IMG_0873 IMG_0888 IMG_0889
IMG_0890 IMG_0895

Review:
It’s been performing great and feels very rugged. The locks and the Rapid Trap’s hinges felt a bit ‘gritty’ and tough to turn at the height of winter but nothing a few squirts of WD-40 couldn’t fix. 😉 Took care to ensure there were no o-rings on that hinge and there wasn’t, beforehand.

Pros: doing what I got it for.

Cons: After ~6000 miles, one winter and summer, the rubber pads at the bottom which makes contact with the luggage rack have finally become unstuck from the box after commuting, the wet road conditions presumably. The rubber pads looked to have provided protection and cushioning. I can get some cupboard cushion pads and put them in. Some of the opaque silica gel (the ones that bathroom tiles are used to finish with, perhaps?) came off easily inside the box.

Looks like chain muck can react/’stain’ the finish. Or it just needs a bit more circular motion cleaning with soapy water and rough surface of a kitchen sponge 😉

Posted by: freelancer2011 | April 27, 2013

Bike Prep: Baseline Pics from Dealership

Manchester, UK, April 2012 – My 2008 BMW F650 GS Twin, 798cc, 71bhp with ~8,000 miles on the clock, 3rd-hand. I caught an early train one Saturday morning all the way to Manchester to pick her up from the dealership. Then, I rode her home to London on the motorway for the first time ever in my life (on 2 wheels, that is). Over the past year, she has undergone major conversion to get her to a decent touring standard.

2008 BMW F650 GS Twin

2008 BMW F650 GS Twin

WB10218028ZT27881_03_DL_230312_3 WB10218028ZT27881_02_DL_230312_2v2

It’s been fun and exciting times. Though sometimes trying in order to get her to where she is today and working with dealerships to right wrongs. Over the next couple of days, I’ll be playing catch-up and posting the various upgrades I’ve added to her.

In order to see and fully understand just how much she has transformed, I figured I’d start with some ‘before’/baseline pics. Please note the picture quality won’t be as good as my other pics as these were taken from the website’s advert.

Posted by: freelancer2011 | April 4, 2013

Product Review: Tutoro Chain Oiler – Automatic Deluxe Kit

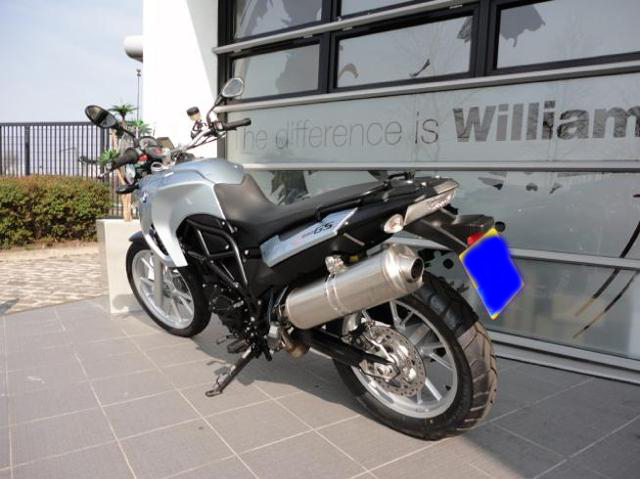
After seeing a brief news snippet in a recent issue of ‘Adventure Bike Rider’ & chatting to a fellow biker about it, I decided to cancel my Scottoiler order and order one of these instead.  At £66 (excl. £4.50 shipping), it’s a saving of £30-£40 off the BMW sole-supplier kit.

Initial impressions when I received it was simplicity.  It was a plain, brown cardboard box.  Liked the notion that there were few instructions and steering the user towards the YouTube vids and gallery pics to let the user decide on the best placement etc.
IMG_0242

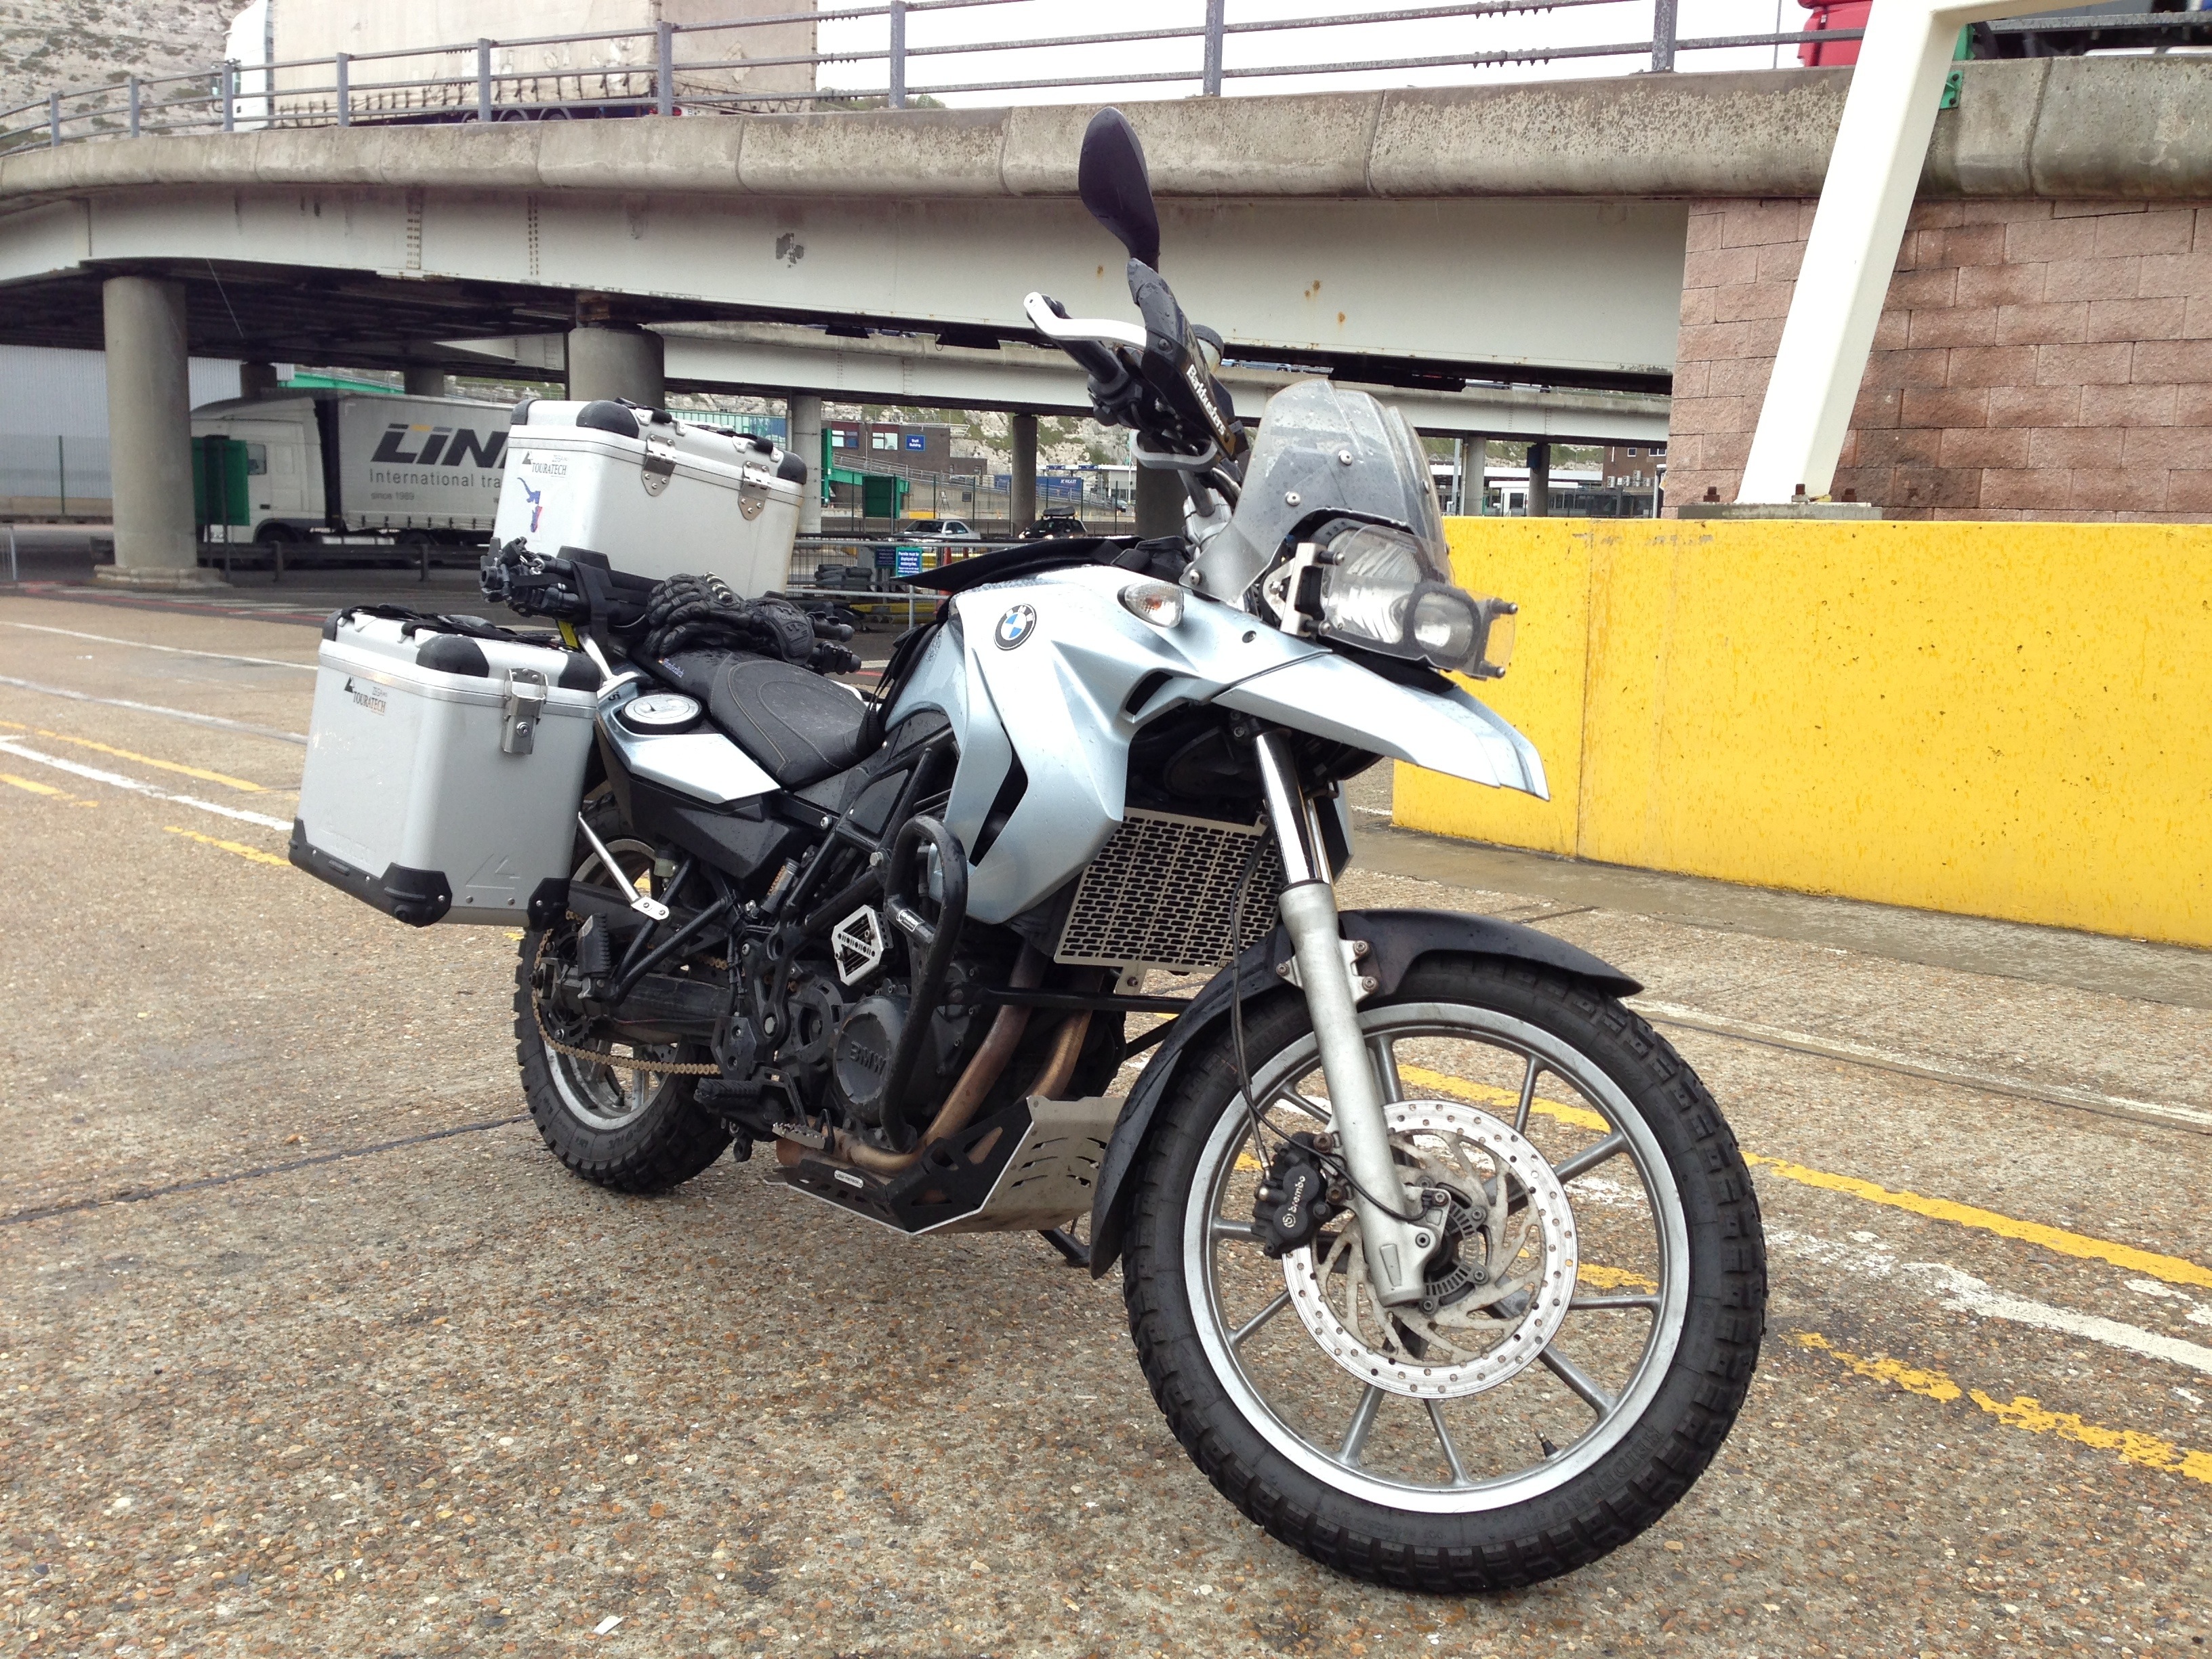
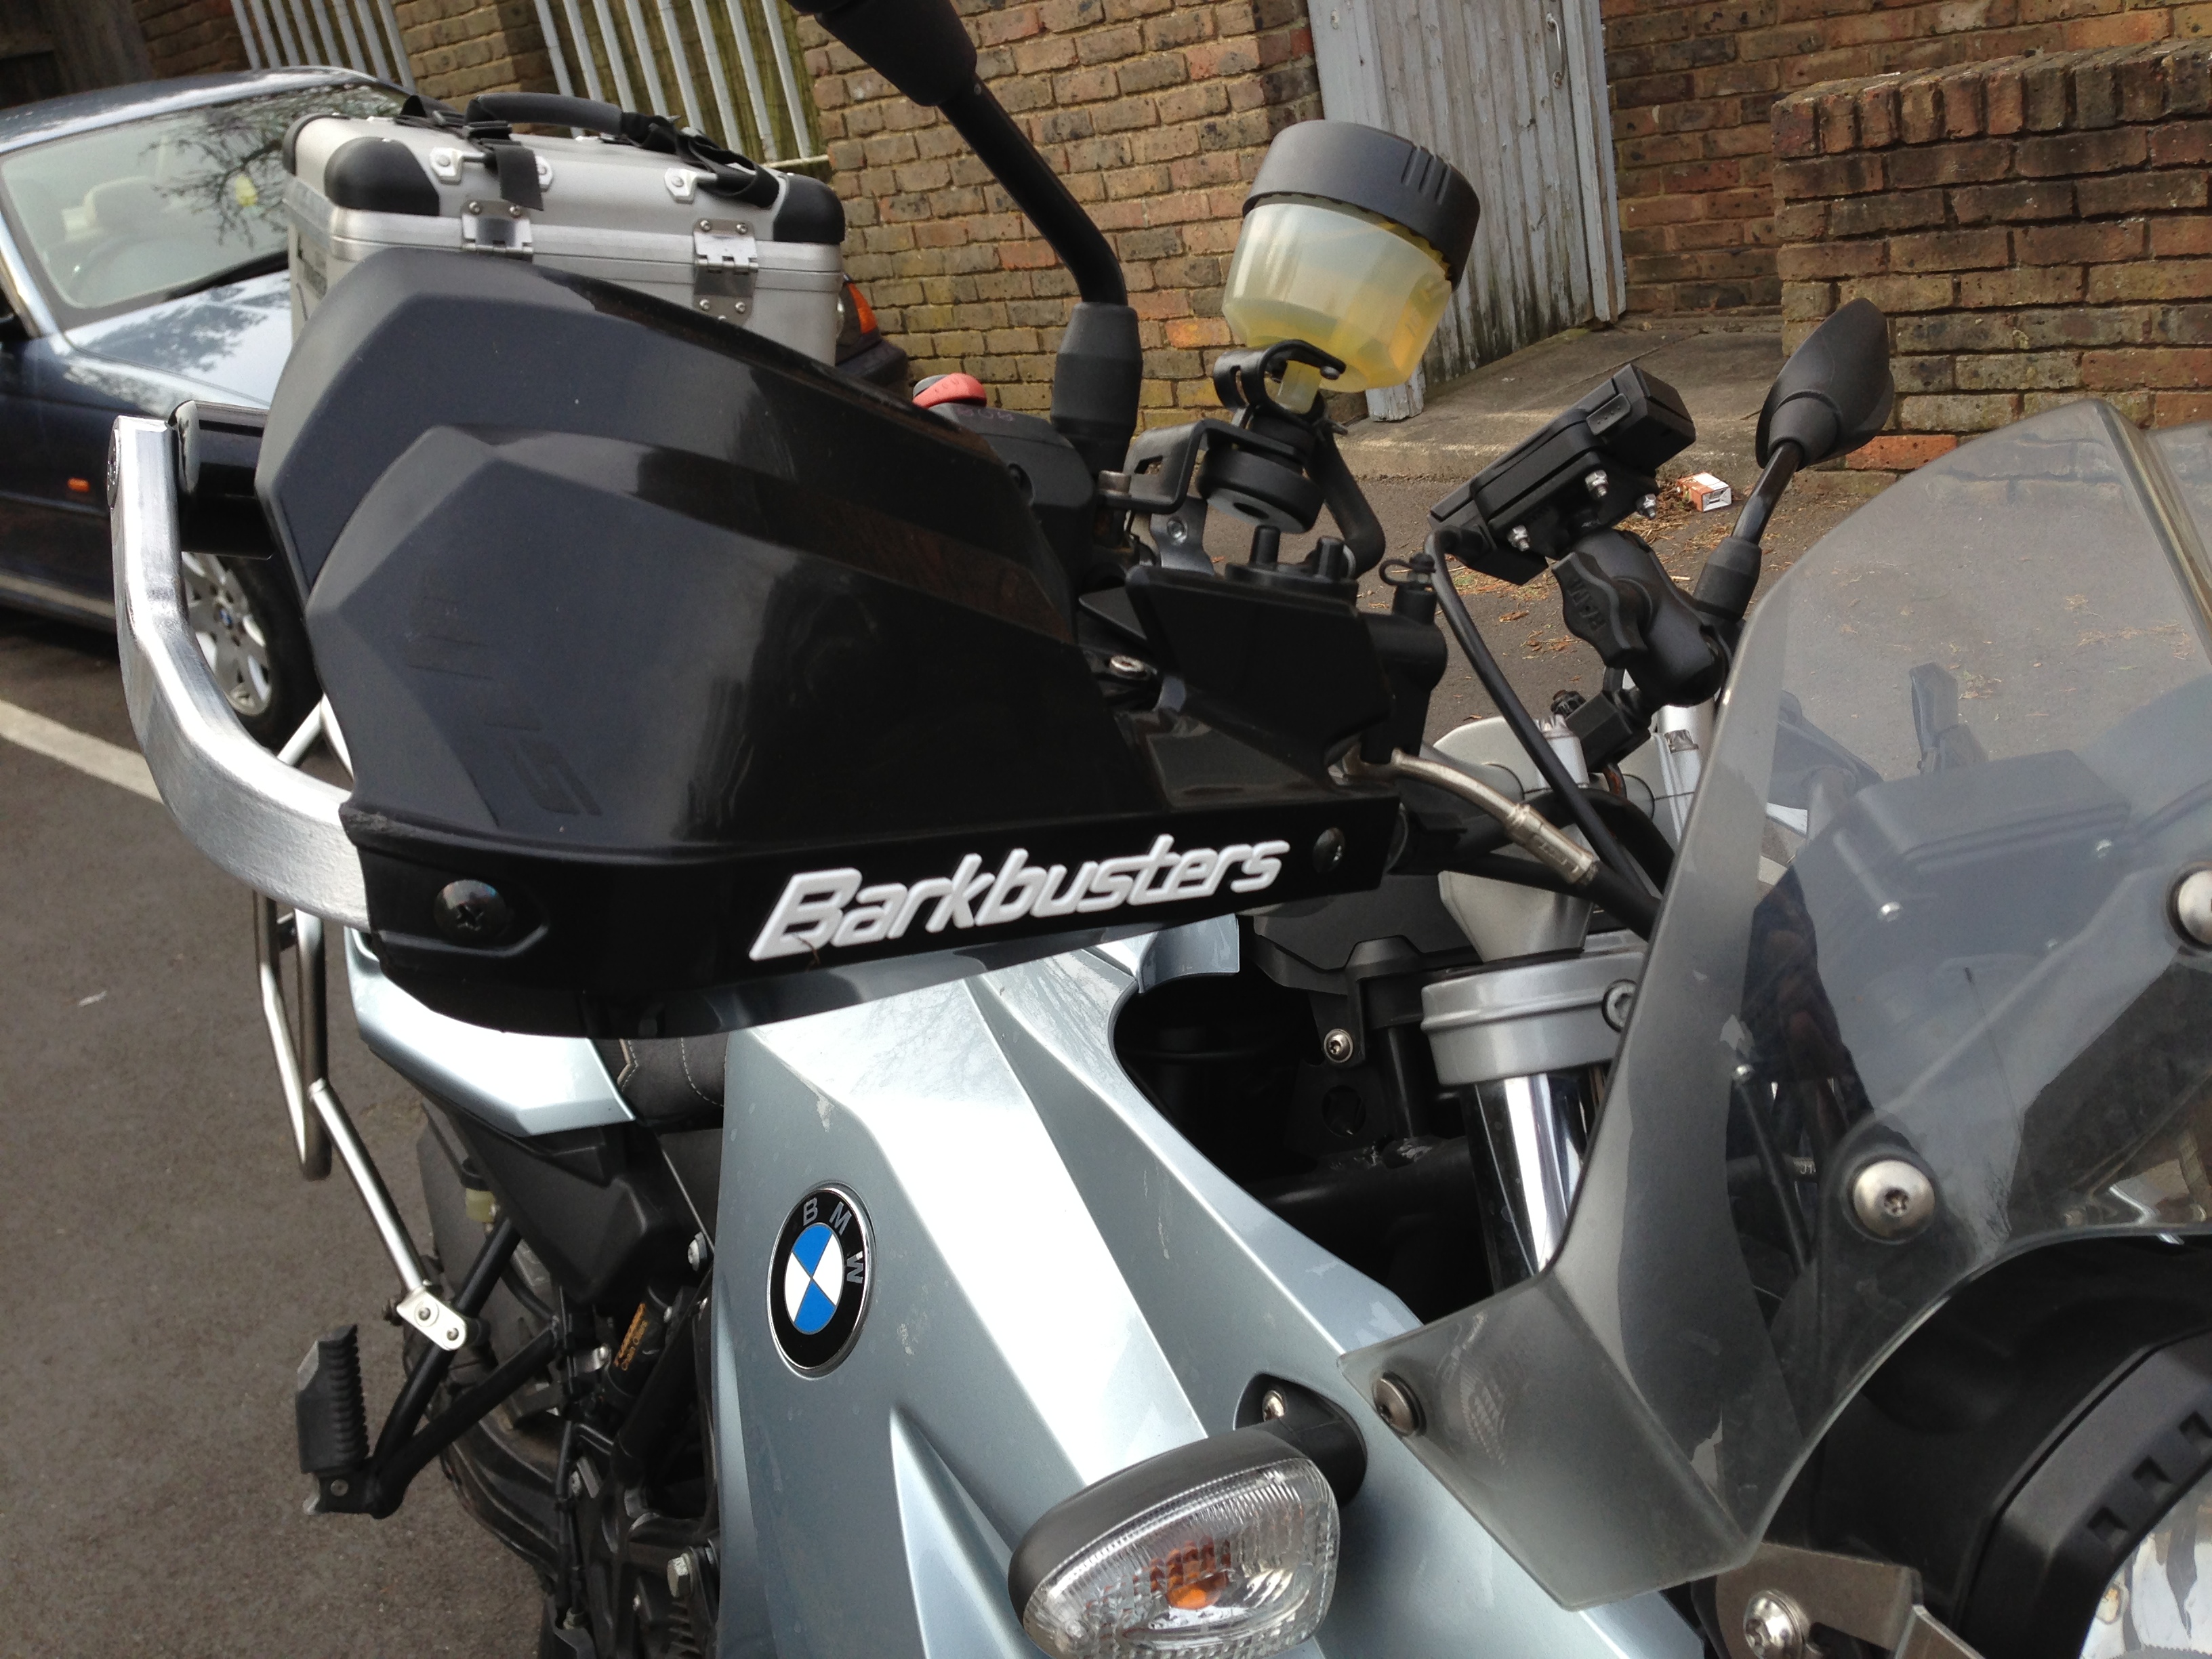
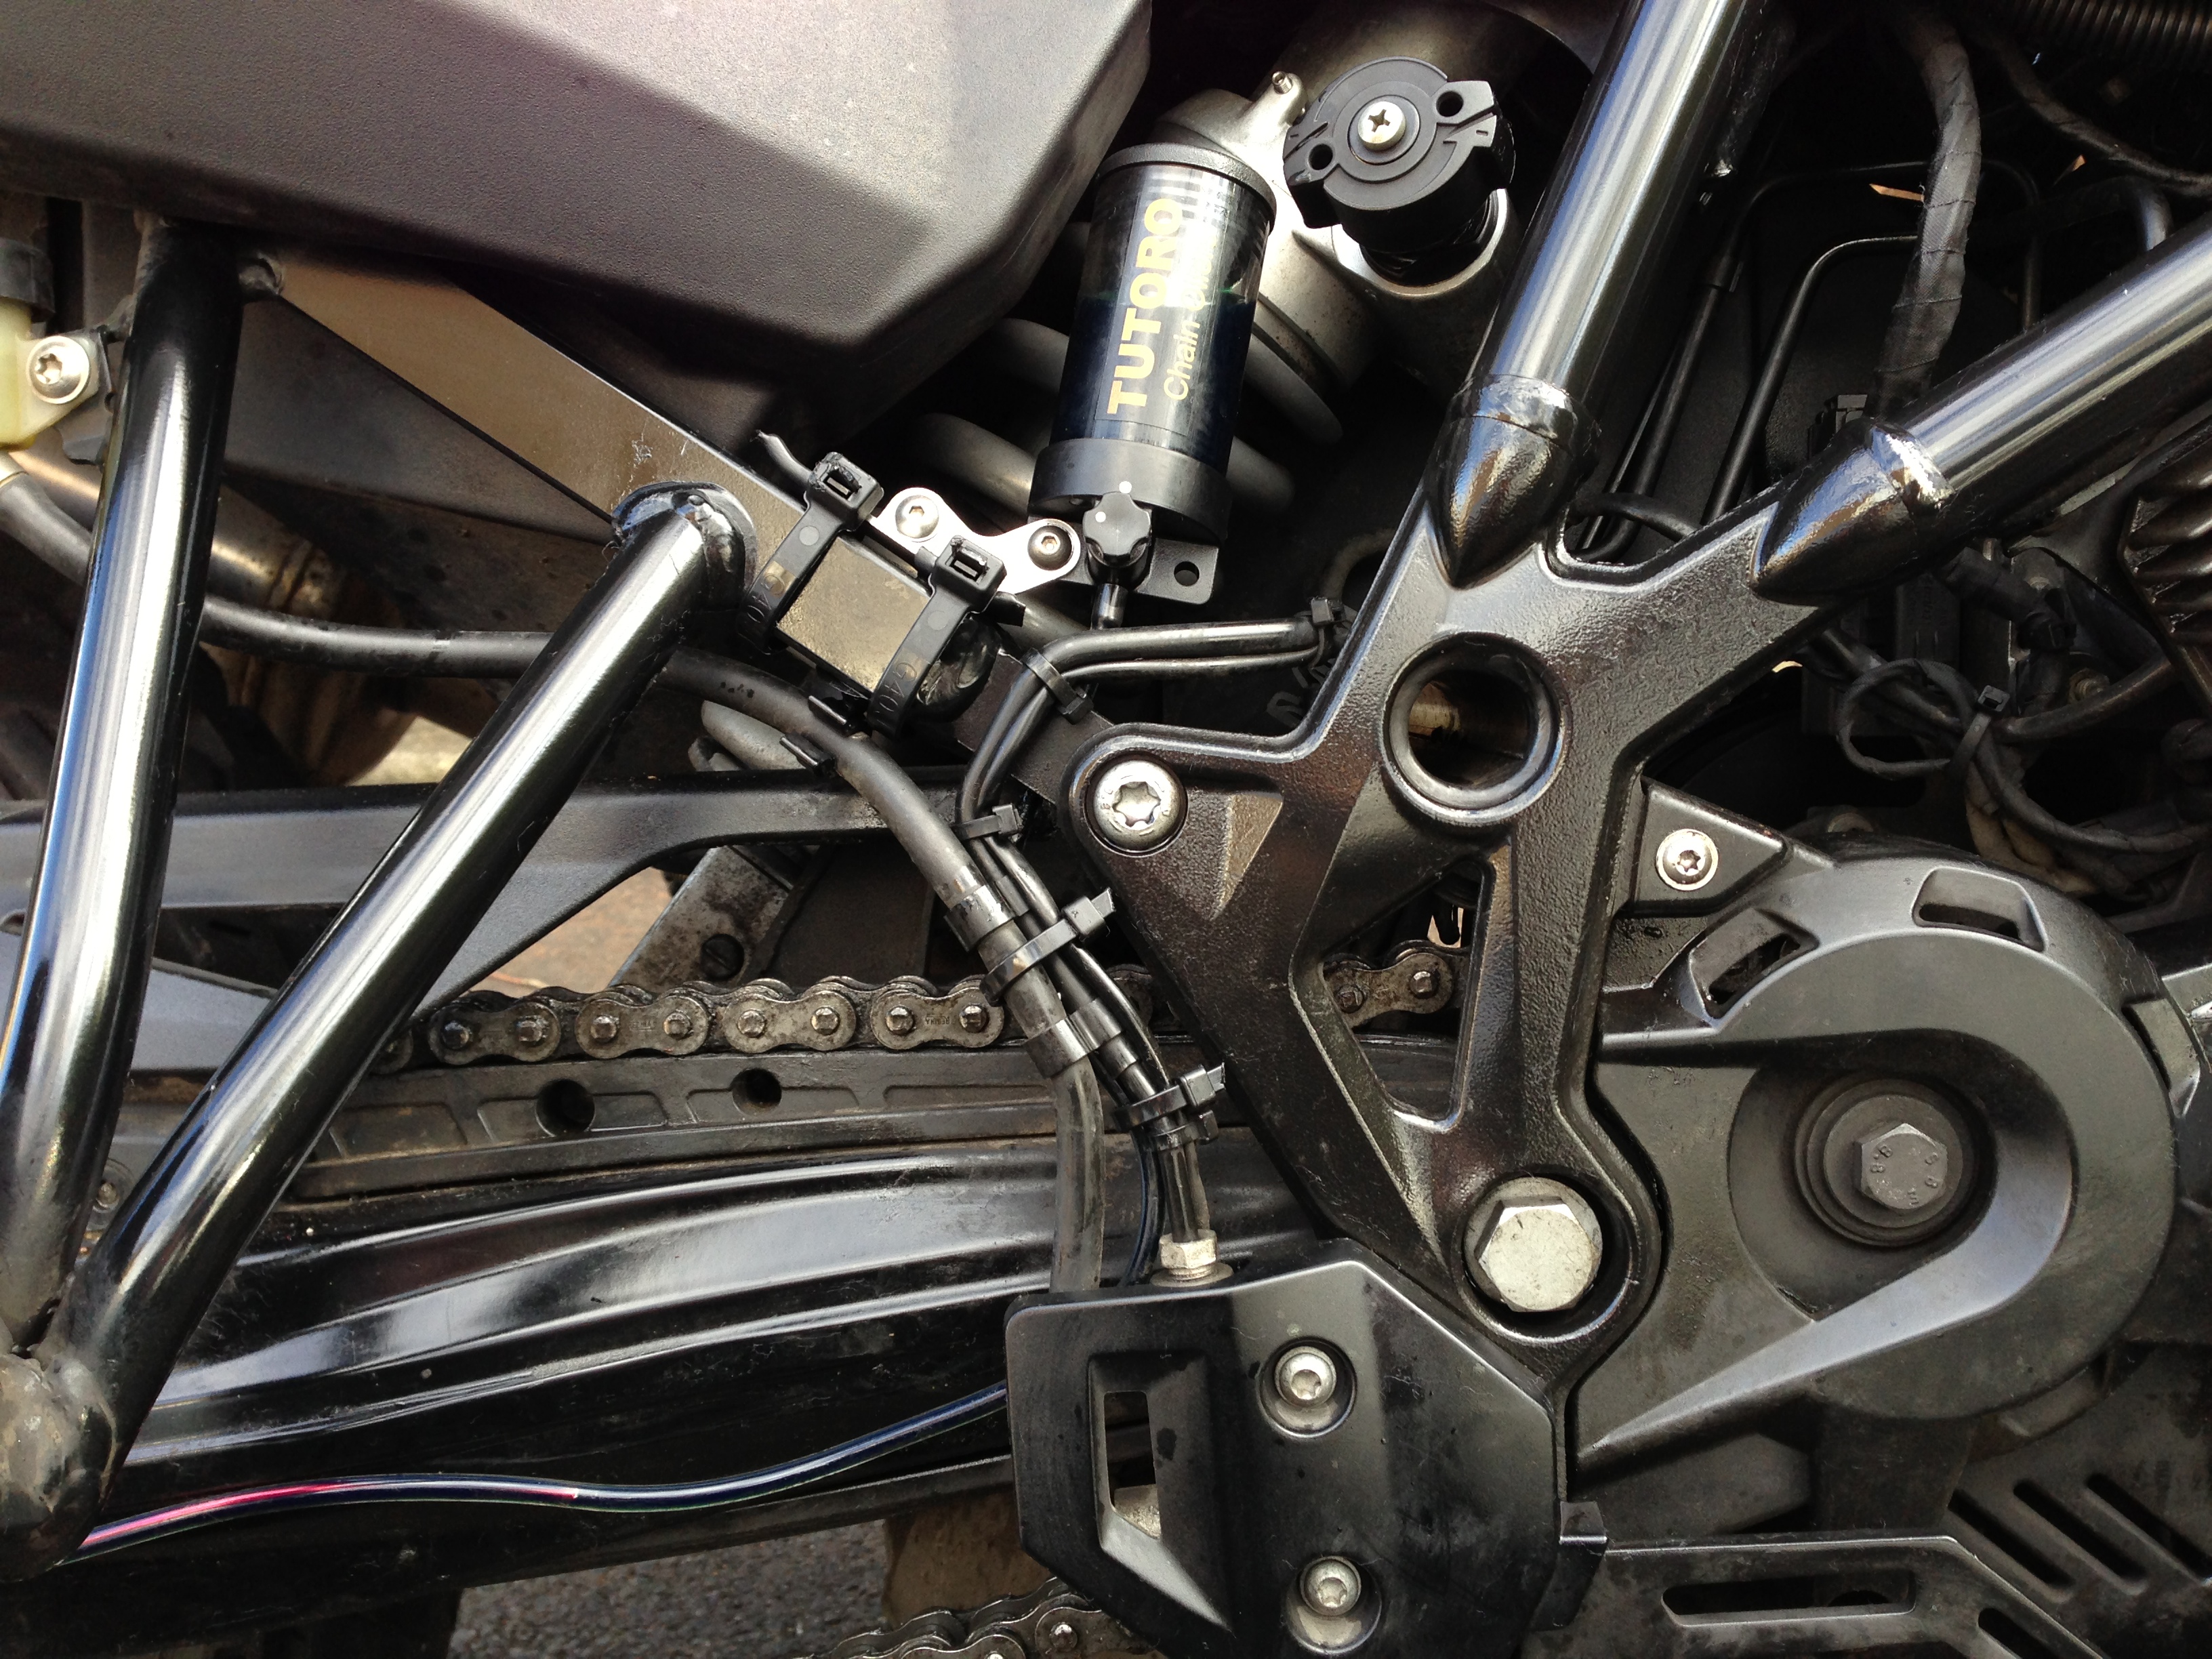
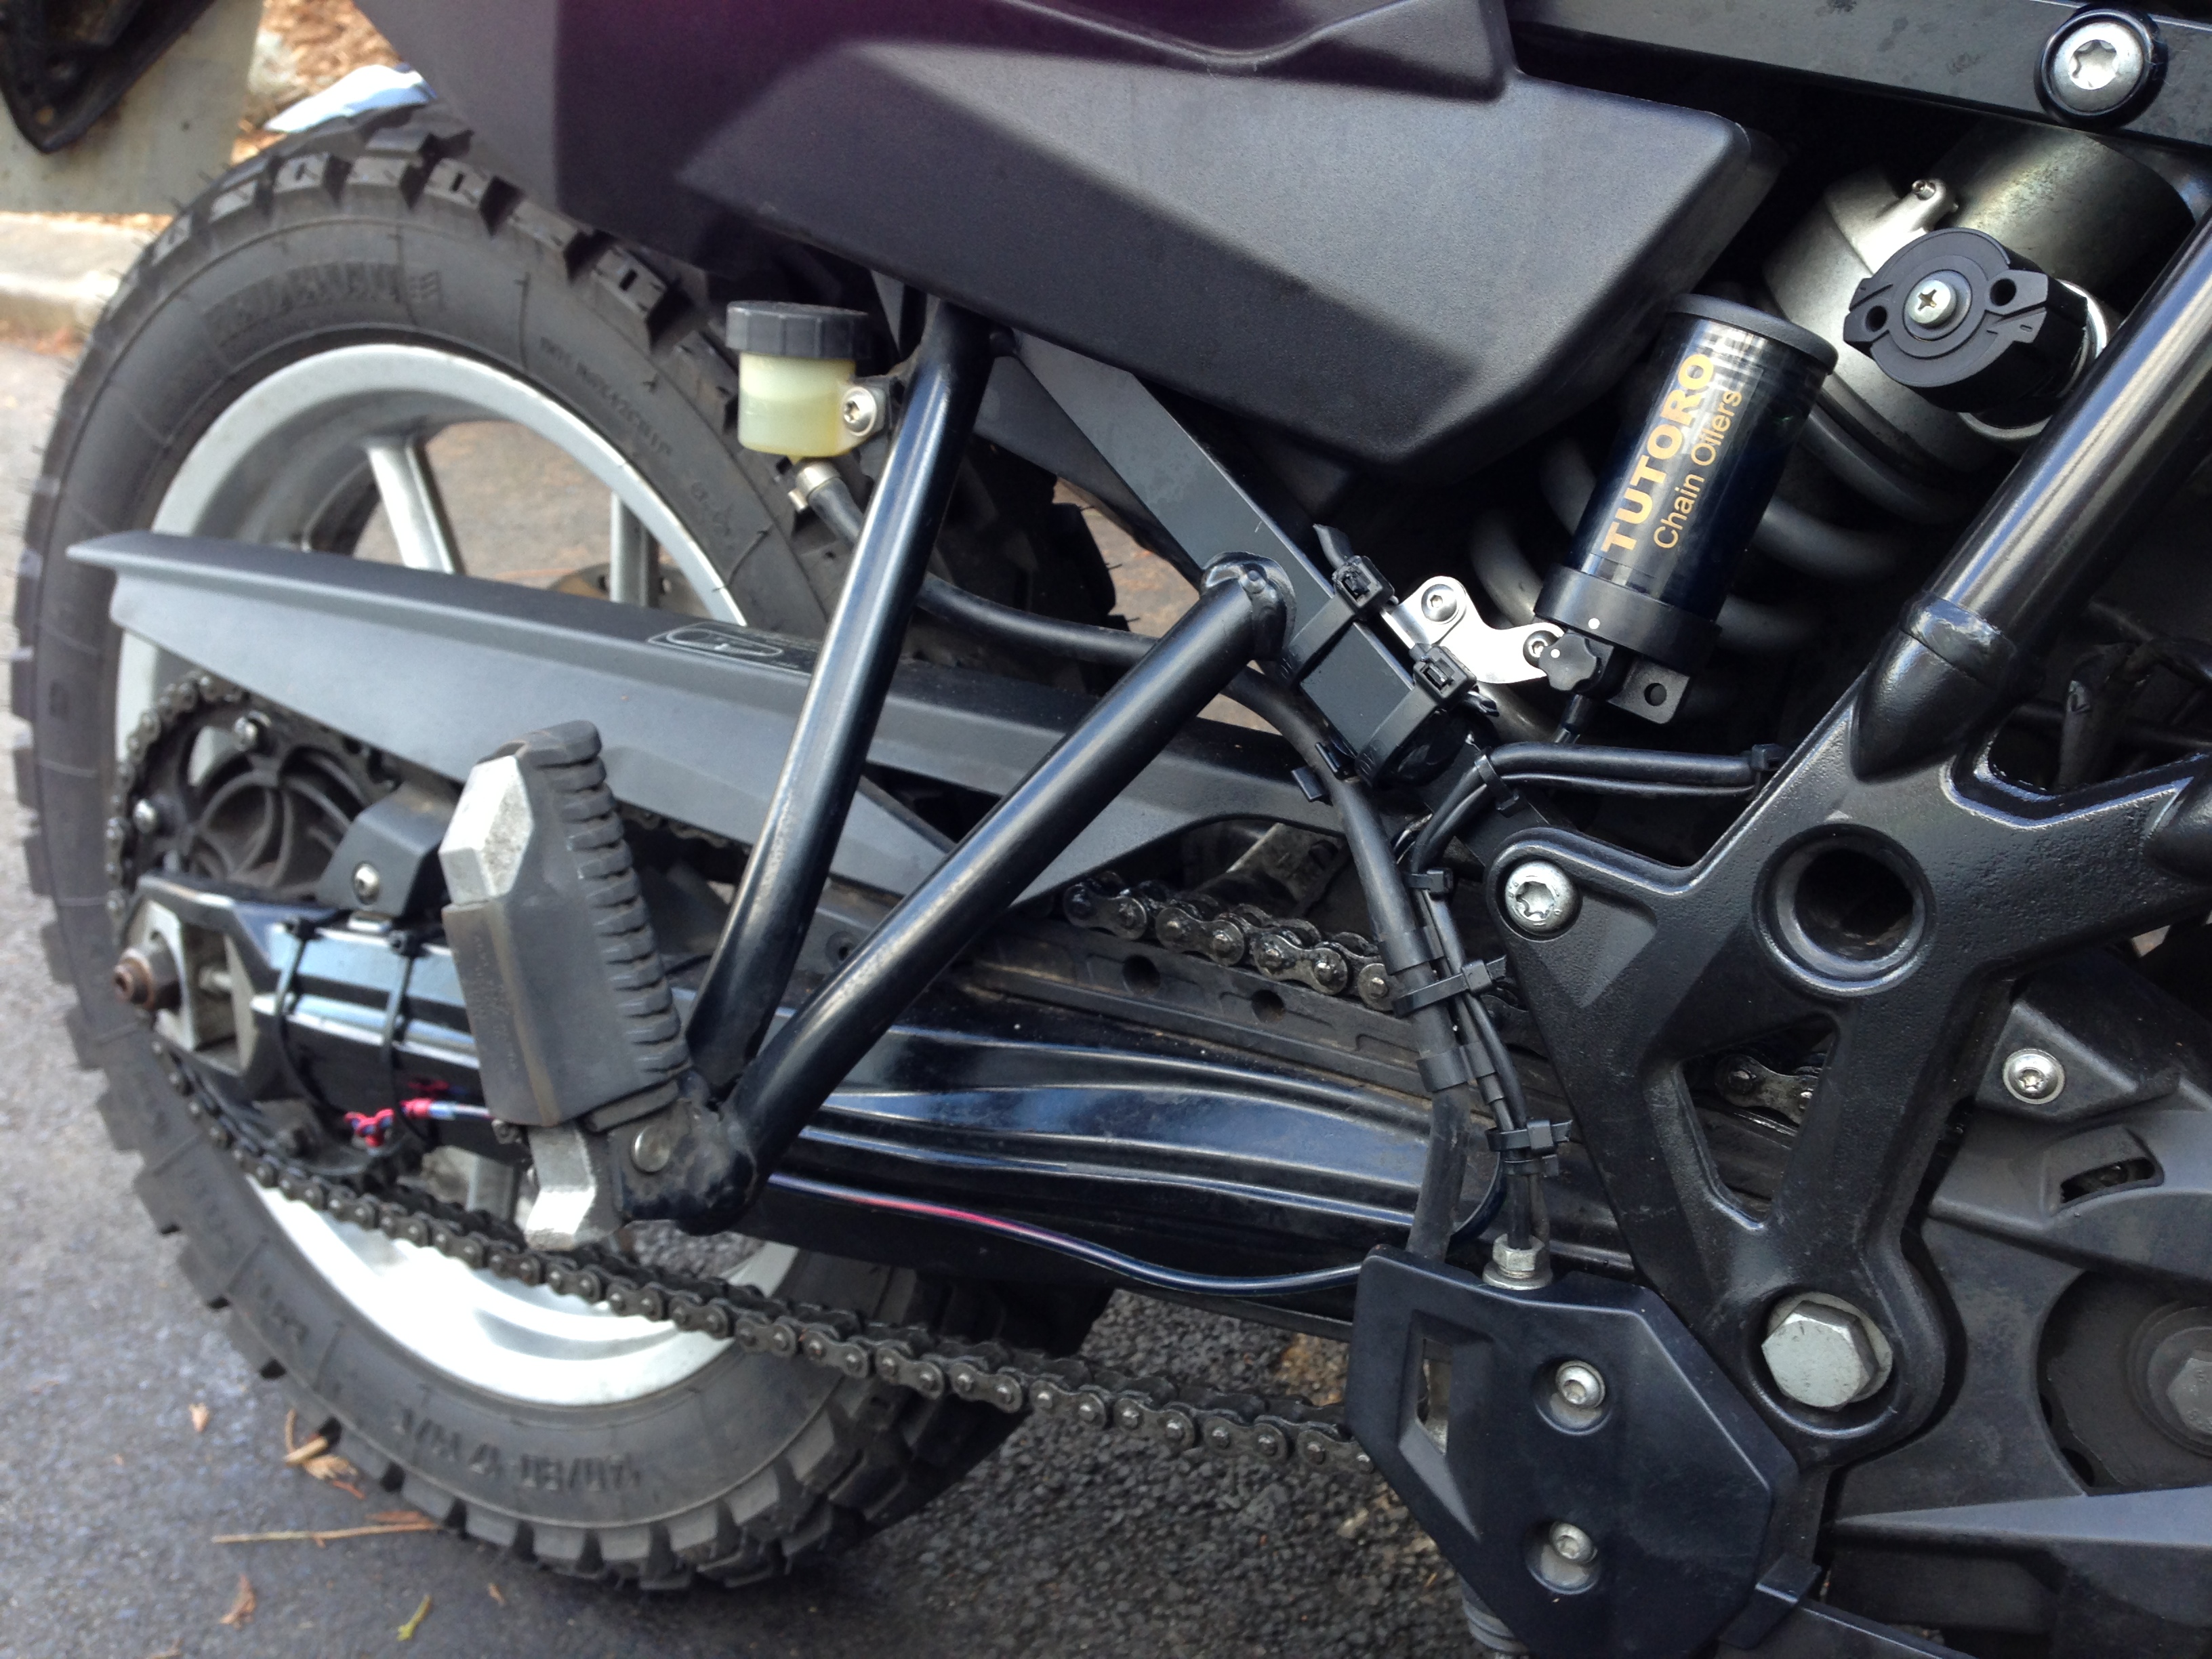
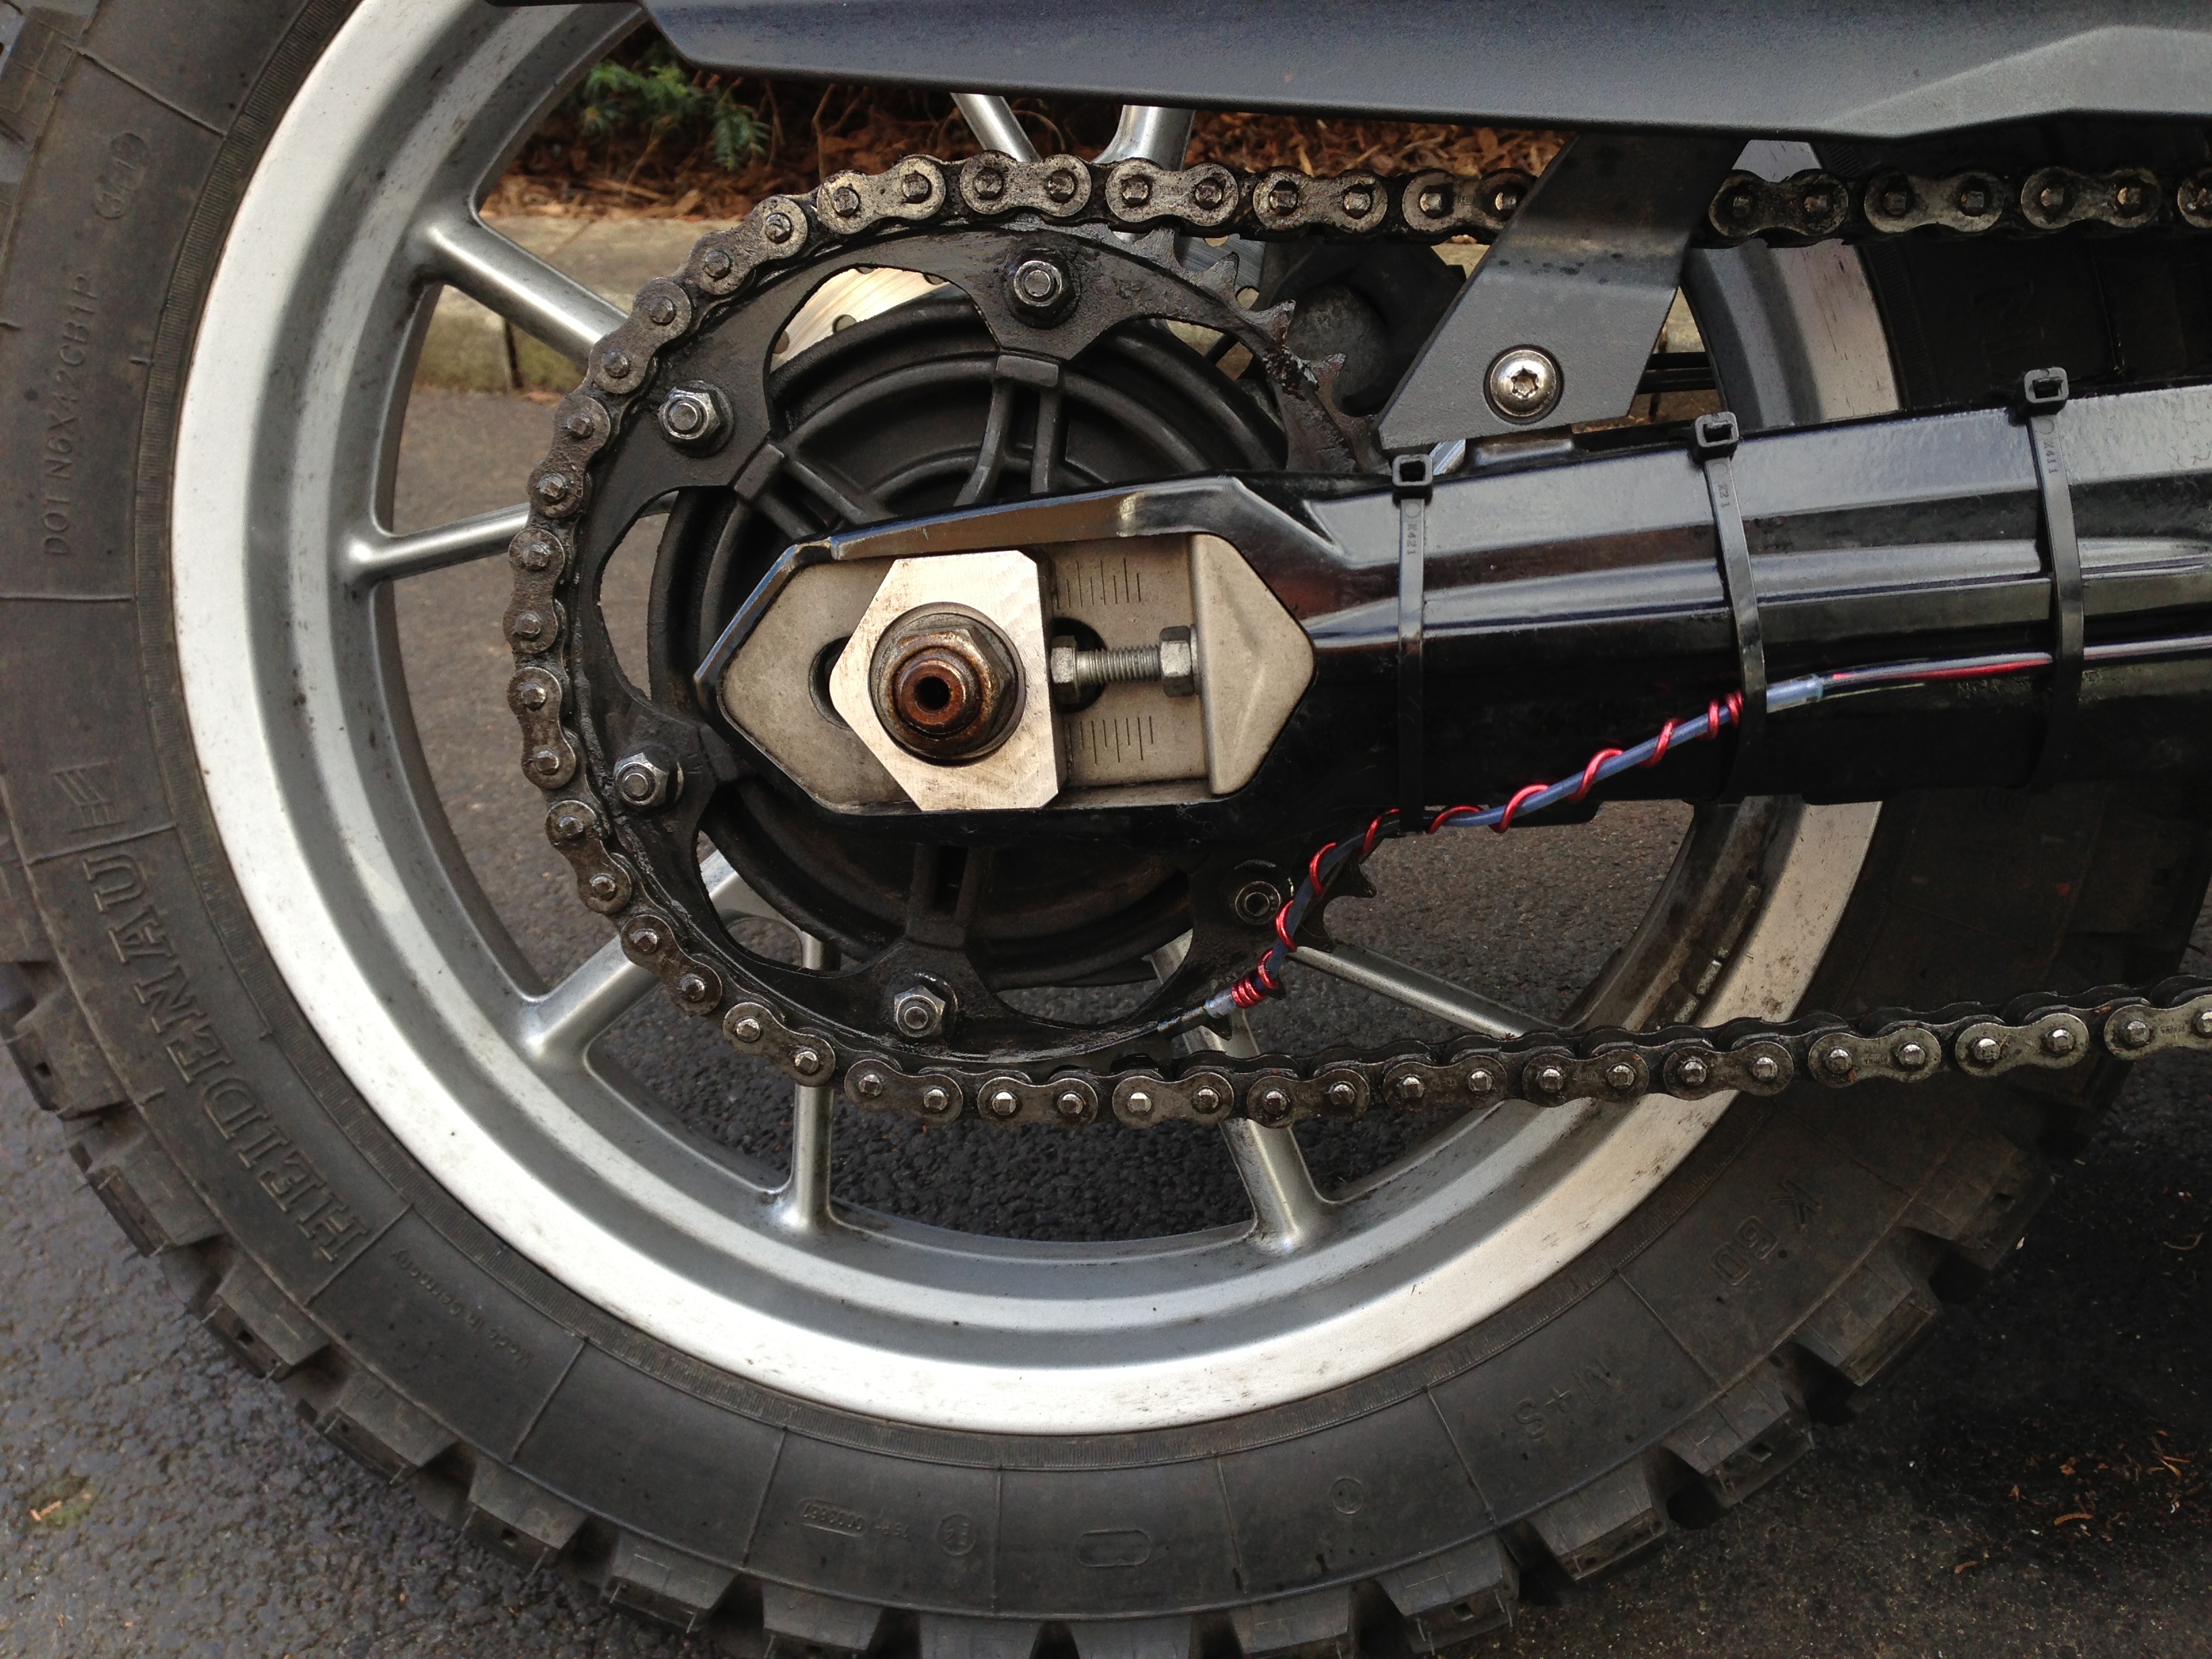
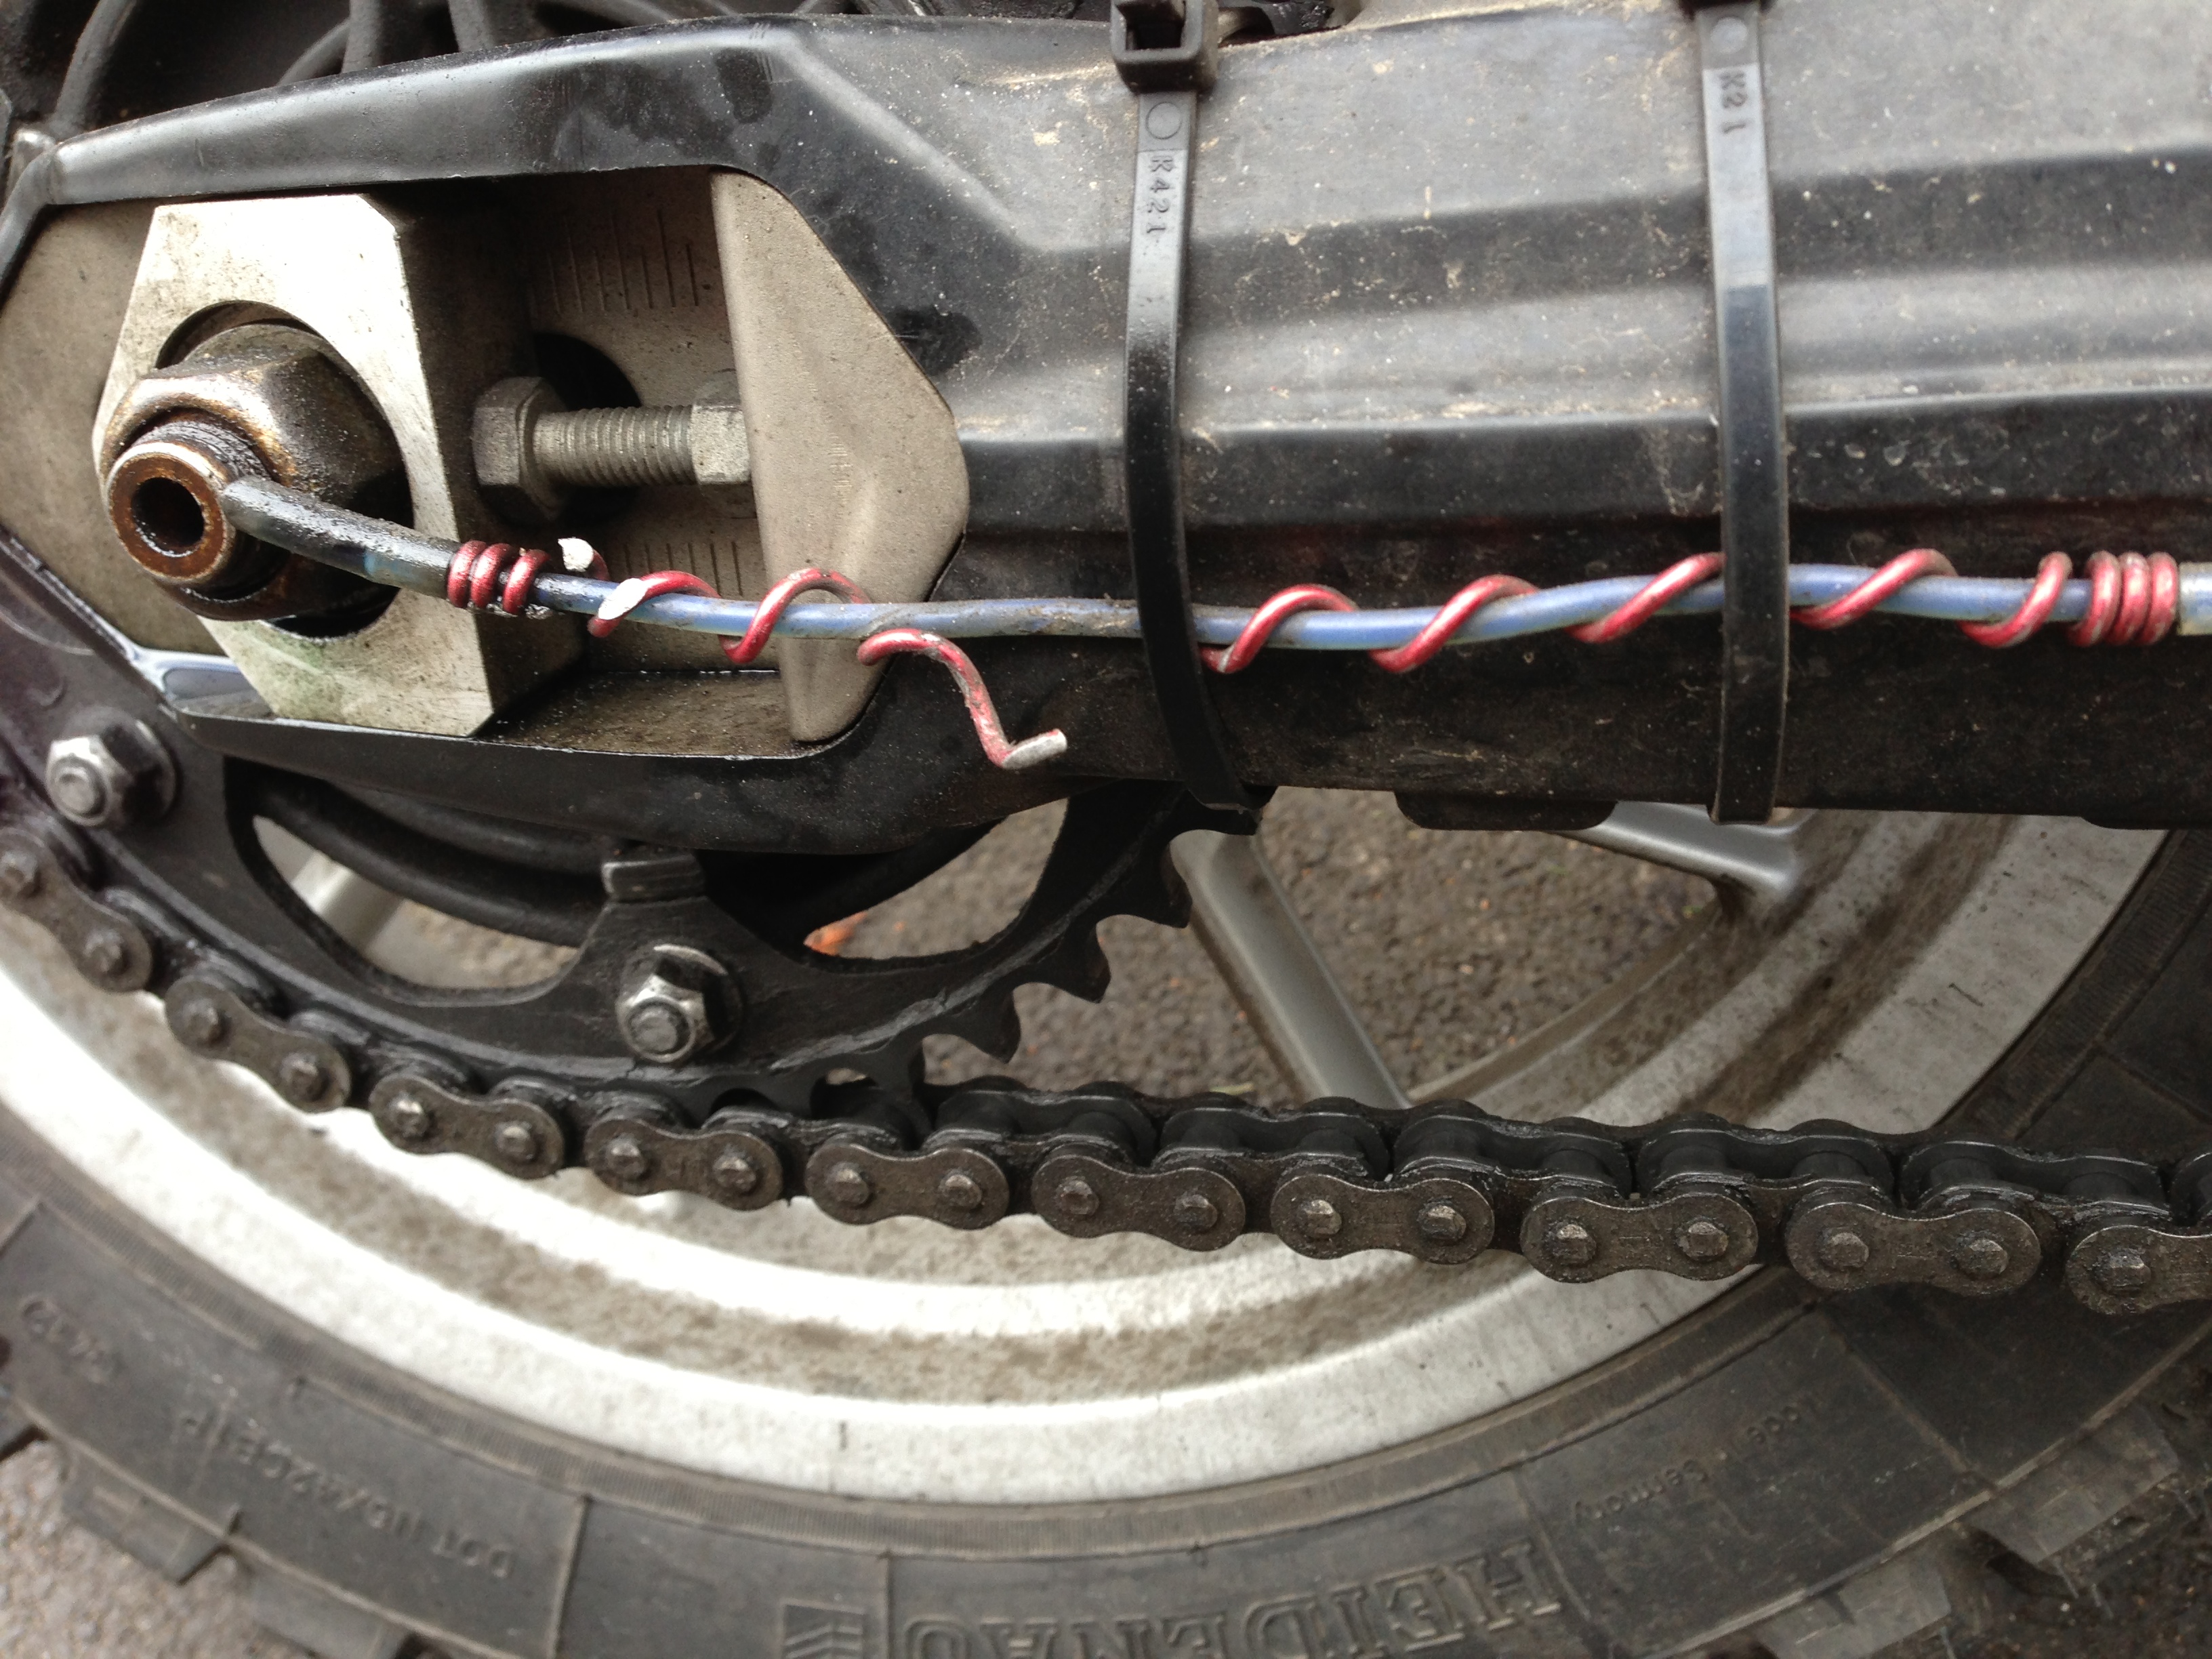
Installation was fairly easy.  You may need some basic ingenuity in using their supplied Allen key and a small 11mm socket/spanner to hold the nut in place when tightening the screw.  Priming the tube with the blueish liquid for the first time was a joy to see 🙂  The delivery rod and flexible, red anodized spiral which helps to maintain the tubing’s shape was a great concept and you can see why the company chose this method.

IMG_0246 IMG_0244 IMG_0245

…Unfortunately, after about 2 weeks of use, the sprial metal actually snapped.  I’m not sure what happened but I imagine just irregular surfaces (maybe a pot hole) must’ve stressed the metal too much.  Nothing else snapped: delivery tube & tie wraps were all OK.  I did contact Tutoro and they’ve referred me to their online pages where they sell spares.  As a customer, slightly disappointed to hear that given that I did mention that I just bought the kit, just installed it and within just 2 weeks part of their kit is broken.

IMG_0303

Thinking outside the box, I’m going to try to get something like a wired coat hanger (or look for more ‘flexible and memorable’ metal-type wiring) and replace the OEM spiral with that.  After a kind technician at the local dealership saw what was going on, he/she kindly soldered(?) the final ‘twist’ of the delivery tube/sprial wiring before the end point made contact with the rear sprocket (so that the fluid gets delivered at the right point, each time and every time).  That seemed to hold the delivery tube in place quite well.  However, with recent rideouts, the ‘soldered’ reinforcement broke off and now I’m having the same issues of the tube flaying around everywhere.

Save myself a few bucks 🙂  I’m confident once both these issues are sorted through trial and error, it should be a worthwhile kit that will pay for itself in time.  I’ll let you know how I get on.

Posted by: freelancer2011 | February 10, 2013

One Year On

Can’t believe I passed my practical exam ONE YEAR ago today!! 😀 It would prove to be another frustrating 2 months waiting for the right bike to come onto the Used market, but the above public announcement in the newspapers on the train back home the day after (02/02/2012) affirmed to me that getting the license was the right thing to do :O)

As well as, setting the clock back for me by 7 years in terms of commuting costs, I never knew that I would enjoy riding SO much. It IS the rides outside of London that I live for. The past 2 wks where I wasn’t riding due to snow was really frustrating but it was good to learn that about myself :O) Riding has been a GAME-CHANGER and has made mobility in and around London so much more easier. Despite constant qualms and protests from many quarters including family, I’m still glad I did it. =)


Source: Transport for London & The Metro, Associated Newspapers Ltd, UK, 02/02/2012.

« Newer Posts - Older Posts »

Categories